Lesson 10 - HTTP, REST, Postman
HTTP
When we think of the Internet, we often think only of the websites which we are visiting. What we often fail to see is the vast network of resources that are utilized when we use that website.
Modern web applications consist of two major parts: a frontend and a backend. I like to use the restaurant analogy to visualize the difference. A traditional restaurant consists of two main parts: a dining room and a kitchen. When we order, we only ever see the nicely-furnished, well-decorated dining room. But when we give our order to the waiter, they must relay that order to the kitchen. A complicated set of instructions is then executed to produce our order and our waiter, like magic, returns with our food.
Similarly, when we use a website, we interact only with the frontend. The frontend is simply a rendering of content that the user can interact with directly. However, when we interact with that frontend, the frontend itslef is normally interacting with a backend that produces the content that we want.
The natural question, then, is how do the frontend and backend communicate? The answer is HTTP. HTTP is the backbone of the Internet. Put simply, it is how computers in a network talk to one another. The Internet is, largely, just a continuous stream of millions of HTTP requests sent back and forth across a vast network. If your computer is a node in the graph of the Internet, then HTTP is the edge connecting it to all others.
HTTP Requests
To communicate across many different machines and across vast networks, we require some standardized form of communication to be able to both send and receive information reliably.
To do this, we turn to HTTP requests. HTTP requests are essentially objects containing information about the type, time, and relevant information as it pertains to a request. We fill out this request and then send it to the server of interest. If that server is meant to respond, it will send back an HTTP response and the relevant data to answer your request.
HTTP requests consist of two parts: the header and the body.
Below is an example of an HTTP header.
GET /home.html HTTP/1.1
Host: developer.mozilla.org
User-Agent: Mozilla/5.0 (Macintosh; Intel Mac OS X 10.9; rv:50.0) Gecko/20100101 Firefox/50.0
Accept: text/html,application/xhtml+xml,application/xml;q=0.9,*/*;q=0.8
Accept-Language: en-US,en;q=0.5
Accept-Encoding: gzip, deflate, br
Referer: https://developer.mozilla.org/testpage.html
Connection: keep-alive
Upgrade-Insecure-Requests: 1
If-Modified-Since: Mon, 18 Jul 2016 02:36:04 GMT
If-None-Match: "c561c68d0ba92bbeb8b0fff2a9199f722e3a621a"
Cache-Control: max-age=0
The first line defines the type of request, also known as the method (more on this below), the location on the server to which the request is made, and the protocol. This first line is also called the start line. The second line contains the name of the server to which the request is made. This is the information that is used to send your request to the appropriate machine to handle it.
The remaining lines are used to specify information about the request. This includes potential authorization, cacheing, handling, etc. At this level, we won't be using these too much, but as your applications become more complicated, taking advantage of these headers may allow for significantly more functionality.
Methods
HTTP defines a set of request methods to indicate the desired action to be performed for a given resource.
GET: TheGETmethod requests a representation of the specified resource. Requests usingGETshould only retrieve data.HEAD: TheHEADmethod asks for a response identical to that of aGETrequest, but without the response body.POST: ThePOSTmethod is used to submit an entity (a form) to the specified resource, often causing a change in state or side effects on the server.PUT: ThePUTmethod replaces all current representations of the target resource with the request payload. In other words, you can usePUTto update a resource.DELETE: TheDELETEmethod deletes the specified resource.CONNECT: TheCONNECTmethod establishes a tunnel to the server identified by the target resource.OPTIONS: TheOPTIONSmethod is used to describe the communication options for the target resource.TRACE: TheTRACEmethod performs a message loop-back test along the path to the target resource.PATCH: ThePATCHmethod is used to apply partial modifications to a resource.
You don't need to know all of them, the most commonly used ones are GET,
POST, PUT, and DELETE.
HTTP Responses
Just as we make requests to a server for information, we also expect a response. Even if we do not expect data in return, the server always sends a response indiciating that it received the request.
Below is an example of a response header. At the very top, you'll see a status code which indicates the type of response. Based on the digit in the hundreths place, we can determine if the request was successful or not.
1XX: Informational2XX: Successful3XX: Redirection4XX: Client Error5XX: Server Error
Here are some of the most common response codes.
200: OK. Meaning that the request of a specific resource (list of TODOs) are successful.201: Created. Meaning that a resource is created / updated successfully.401: Unauthorized. Meaning that the request is unauthorized, the client needs to be logged in.403: Forbidden. Meaning that the resource is not available for the client.404: Not found. Meaning that the resource accessing is not served.418: I'm a teapot. Meaning that the server refuses the attempt to brew coffee with a teapot.500: Server error.
Making a request
curl vs. browser
curl is your machine's built in way of making requests to external websites. Here, we will use curl to show that an HTTP request is nothing but two computers talking to each other.
Open your terminal and type the following:
curl https://pokeapi.co/api/v2/pokemon/ditto
You should see a response that looks absolutely enormous, but something like
this:
https://pokeapi.co/api/v2/pokemon/ditto.
THIS IS THE KEY INTUITION: Notice, that entering a URL into your browser is
exactly the same thing as making a GET request to that URL. Now you understand
how we navigate the Internet! curl and your browser are just two of many, many
different ways to make a request, and the data returned is just one of many
types we can return.
Anatomy of a Request
When we make HTTP requests, we use a particular organization to ensure that the receiving server can process our request. Note: This example focuses on requests without a body.
Let's look at the following request
GET 'https://pokeapi.co/api/v2/pokemon/ditto'
Now let's look at the components of our request.
https:// defines the protocol we are using. In this case, we are using the
HTTP secure protocol
[pokeapi.co/](http://pokeapi.com/) defines the server (computer) to which we
are making our request. When we make a request, we are essentially making it to
a particular IP address. In the case of domain names, your Internet service
provider does some cool stuff (which I won't go into here) which essentially
aliases this domain name to an IP address to complete your request.
/api/v2/ We will learn later about the importance of this. For now, think of
it like this: In order to make our request, we have to request a certain part of
the website where the content we want is kept. For example, navigate to the WDB
website webatberkeley.org. As you click on the
different options in the menu, notice that the URL in the search bar is
changing. To get the information you want, you need to go to the location where
it is stored. Our requests follow a similar (In fact, directly related) pattern.
We must make our request in the right place to get what we want. In this case,
we are making a request to the API, specifically v2 of the API. You can also
think of it as a large file system, where to access the files we want, we
navigate to their location at the server (again directly related to how websites
function).
/pokemon/ditto It may not be immediately clear why these are the search terms,
or why they differ from /api/v2 in terms of functionality, but bear with me.
Ultimately, all of these / 's represent how the designers of the website have
chosen to organize the website. When we make a request to an API, we must make
the request directly to the API, or else the website will likely return HTML
files to be rendered. That is why this particular website used /api/v2.
Every website will be different. It is up to the designer how they
organize their website, and as the client, it is your responsibility to check
the docs for how you can get what you need. After we access the API, we are
telling the website: "Please look at Pokemon, and of those, please look at
Ditto." The last term is usually a unique key which maps to a single entry of
data which is what you want.
Fancier requests
URL encoding is a fairly straightforward part of web development so we won't dive too deeply into this, it is more of something you learn as you go, and a lot of the packages that we use handle these kinds of things for you. If you were curious, we can in fact add more information to our get request.
Instead of just telling the web server where to get the data, we can, in some
cases specify the type of data that we want to get. Where as the previous
request returned exactly the data item that we need, think of this as more like
a search. We can give the website some query parameters to return the data we
want. This is done with the /?key1=value1&key2=value2 syntax. The ?
specifies that we are encoding query parameters, and the & key allows for
encoding of multiple parameters.
The following API returns a random number when called.
https://csrng.net/csrng/csrng.php
Let us try calling it with no parameters.
curl 'https://csrng.net/csrng/csrng.php'
You should see something like this:
[
    {
        "status":"success",
        "min":0,
        "max":9007199254740991,
        "random":1462051404510535
    }
]
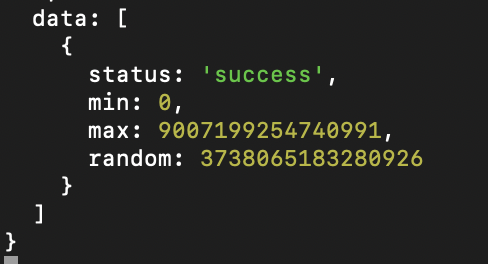
Now let's try calling it with some encoded parameters. Type in the following to your terminal.
curl 'https://csrng.net/csrng/csrng.php?min=1&max=100'
You should now see something like this:
[
    {
        "status":"success",
        "min":1,
        "max":100,
        "random":44
    }
]
Notice that now, the API is only returning random numbers between the parameters that we specified! In fact, we can clearly see that the API received our parameters and set the min and max accordingly. This becomes important in applications like search and efficient design (querying instead of constantly subdividing resources). For example, type something into Google and look at the URL! What might this tell you? Think on it.
JSON
Look at our last example. You may be wondering, why does the response look like
that? When we make requests to an API, if we get a status 200 code we can
expect that the server will return some data. What kind of data it returns
depends on what kind of data we are seeking. In some cases, it might return
entire HTML pages, that is what your browser will render into a "website". In
other cases, we simply want a snippet of data from our server, not an entire
page. In order to the server to return this kind of data in a standardized and
easily accessible way, we use JSON to send the data. JavaScript Object Notation
is an open standard file format and data interchange format. While it does say
JavaScript in the name, think of JSON as completely language agnostic. It is
fair to say that JSON is one of the backbones of the Internet. Much of the data
that is exchanged between servers and clients is sent in JSON. Here is an
example of JSON:
    {
        "status":"success",
        "min":1,
        "max":100,
        "random":[44, 20, 30],
        "extra": {
            "hello": "goodbye",
            "goodday": "goodnight"
        }
    }
NOTE: I've added the "extra" field to demonstrate that JSON can nest JSON, this would not have been in your response from the previous example.
JSON is much like a dictionary in Python or a Map in Java. Contained within the object are several keys which map to values. These values can be strings (wrapped in quotes), numbers, lists, or even more objects.
JSON is critical to understanding how we exchange data. It not only defines how
we receive data from the server (GET for example), but it also defines how we
send data to the server (POST, PUT, DELETE).
Here is an example of a GET request with the fields in JSON.
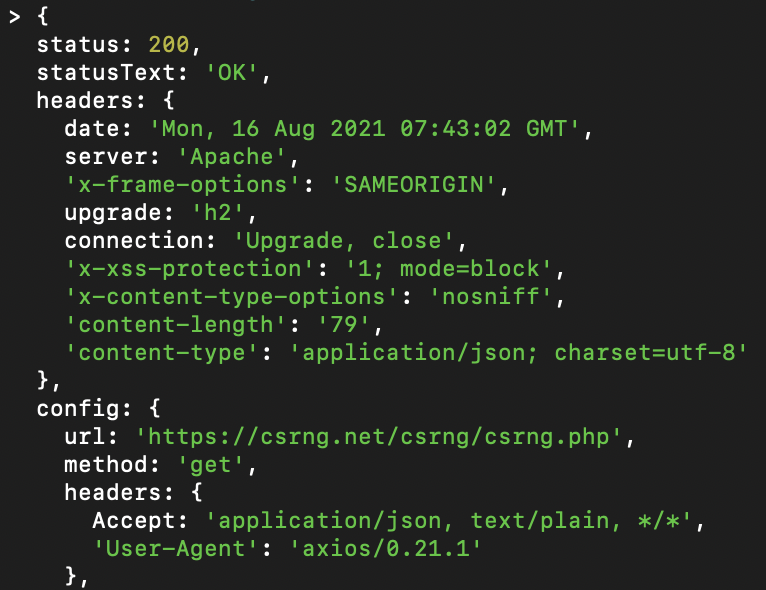
You do not need to worry about what all these fields mean, just notice the way
that necessary information is organized and easily accessible. Status Code:
200, url, method: GET , and data, are all incredibly important pieces of
information, and JSON makes them significantly easier to access in a
standardized way.
REST API
REST API is an acronym for REpresentational State Transfer. It is simply a style for how API should be constructed and how data is transmitted.
Here are the six guiding principles of REST from https://restfulapi.net/:
- Client-server – By separating the user interface concerns from the data storage concerns, we improve the portability of the user interface across multiple platforms and improve scalability by simplifying the server components.
- Stateless – Each request from client to server must contain all of the information necessary to understand the request, and cannot take advantage of any stored context on the server. Session state is therefore kept entirely on the client.
- Cacheable – Cache constraints require that the data within a response to a request be implicitly or explicitly labeled as cacheable or non-cacheable. If a response is cacheable, then a client cache is given the right to reuse that response data for later, equivalent requests.
- Uniform interface – By applying the software engineering principle of generality to the component interface, the overall system architecture is simplified and the visibility of interactions is improved. In order to obtain a uniform interface, multiple architectural constraints are needed to guide the behavior of components. REST is defined by four interface constraints: identification of resources; manipulation of resources through representations; self-descriptive messages; and, hypermedia as the engine of application state.
- Layered system – The layered system style allows an architecture to be composed of hierarchical layers by constraining component behavior such that each component cannot “see” beyond the immediate layer with which they are interacting.
- Code on demand (optional) – REST allows client functionality to be extended by downloading and executing code in the form of applets or scripts. This simplifies clients by reducing the number of features required to be pre-implemented.
A server application that offers a REST API is also called a RESTful server.
Postman
Postman is an incredibly helpful tool for testing and validating our APIs. In this case, REST APIs. Postman is essentially a systematic and user-friendly way to send predefined requests.
Let's open Postman together.
Once you create an account and login, you will be met with a picture of your workspace. Click on Workspaces > My Workspace. There should be nothing there except maybe an example request that we could make. We will now be returning to our previous examples to show how we can make systematic GET requests to the same APIs.
Additionally, /db/all supports a query param specifying the maximum number of
items to return.
I will teach you how to run this program fully, but for the purpose of this exercise,
EXTRA: RESTful Server in Action and Postman
To understand REST API and HTTP methods a step further, let us take a look at a RESTful server in action.
Let's say we are building a TODO app. Take a look at the following code. Pay close attention to what the comments address.
const express = require('express');

const app = express();

var port = process.env.PORT || 8080;

var router = express.Router();

const bodyParser = require('body-parser');

app.use(bodyParser.urlencoded({ extended: false }));
app.use(bodyParser.json());

// The method of the root url. Be friendly and welcome our user :)
router.get('/', function (req, res) {
  res.json({ message: 'Welcome to the TODO app.' });
});

// All HTTP methods under the /todos URL.
router
  .route('/todos')
  // This GET method is in charge of returnning all the todos.
  .get((req, res) => {
    res.json({ message: 'Return all todos.' });
  })
  // This POST methods is used to create a new todo.
  // Its request will have a body, containing the content of the new todo.
  .post((req, res) => {
    res.json({
      message: 'Create a new todo: ' + '1' + ' - ' + req.body.content,
      todo_id: '1',
      content: req.body.content,
    });
  });

// All HTTP methods under the /todos/:todo_id URL.
// The /:todo_id is a parameter within the URL that specifies a particular todo.
router
  .route('/todos/:todo_id')
  // This GET method is used to get the content from a specific todo.
  .get((req, res) => {
    res.json({ message: 'Get the content from a todo.' });
  })
  // We use PUT method to update a todo's content.
  .put((req, res) => {
    res.json({
      message:
        'Update the todo: ' + req.params.todo_id + ' - ' + req.body.content,
      todo_id: req.params.todo_id,
      content: req.body.content,
    });
  })
  // DELETE method is used to delete a todo.
  .delete((req, res) => {
    res.json({ message: 'Delete a todo.' });
  });

app.use('/api', router); // API Root url at: http://localhost:8080/api

app.listen(port);
console.log('Server listenning on port ' + port);
Now with the dummy server ready, how should we send all the HTTP requests? Introduce a new tool in our workflow —— postman.
Let's start the server with npm run start and see how can we interact with the
server.
Postman
Postman is a platform for API development. It can easily build and send out API requests.
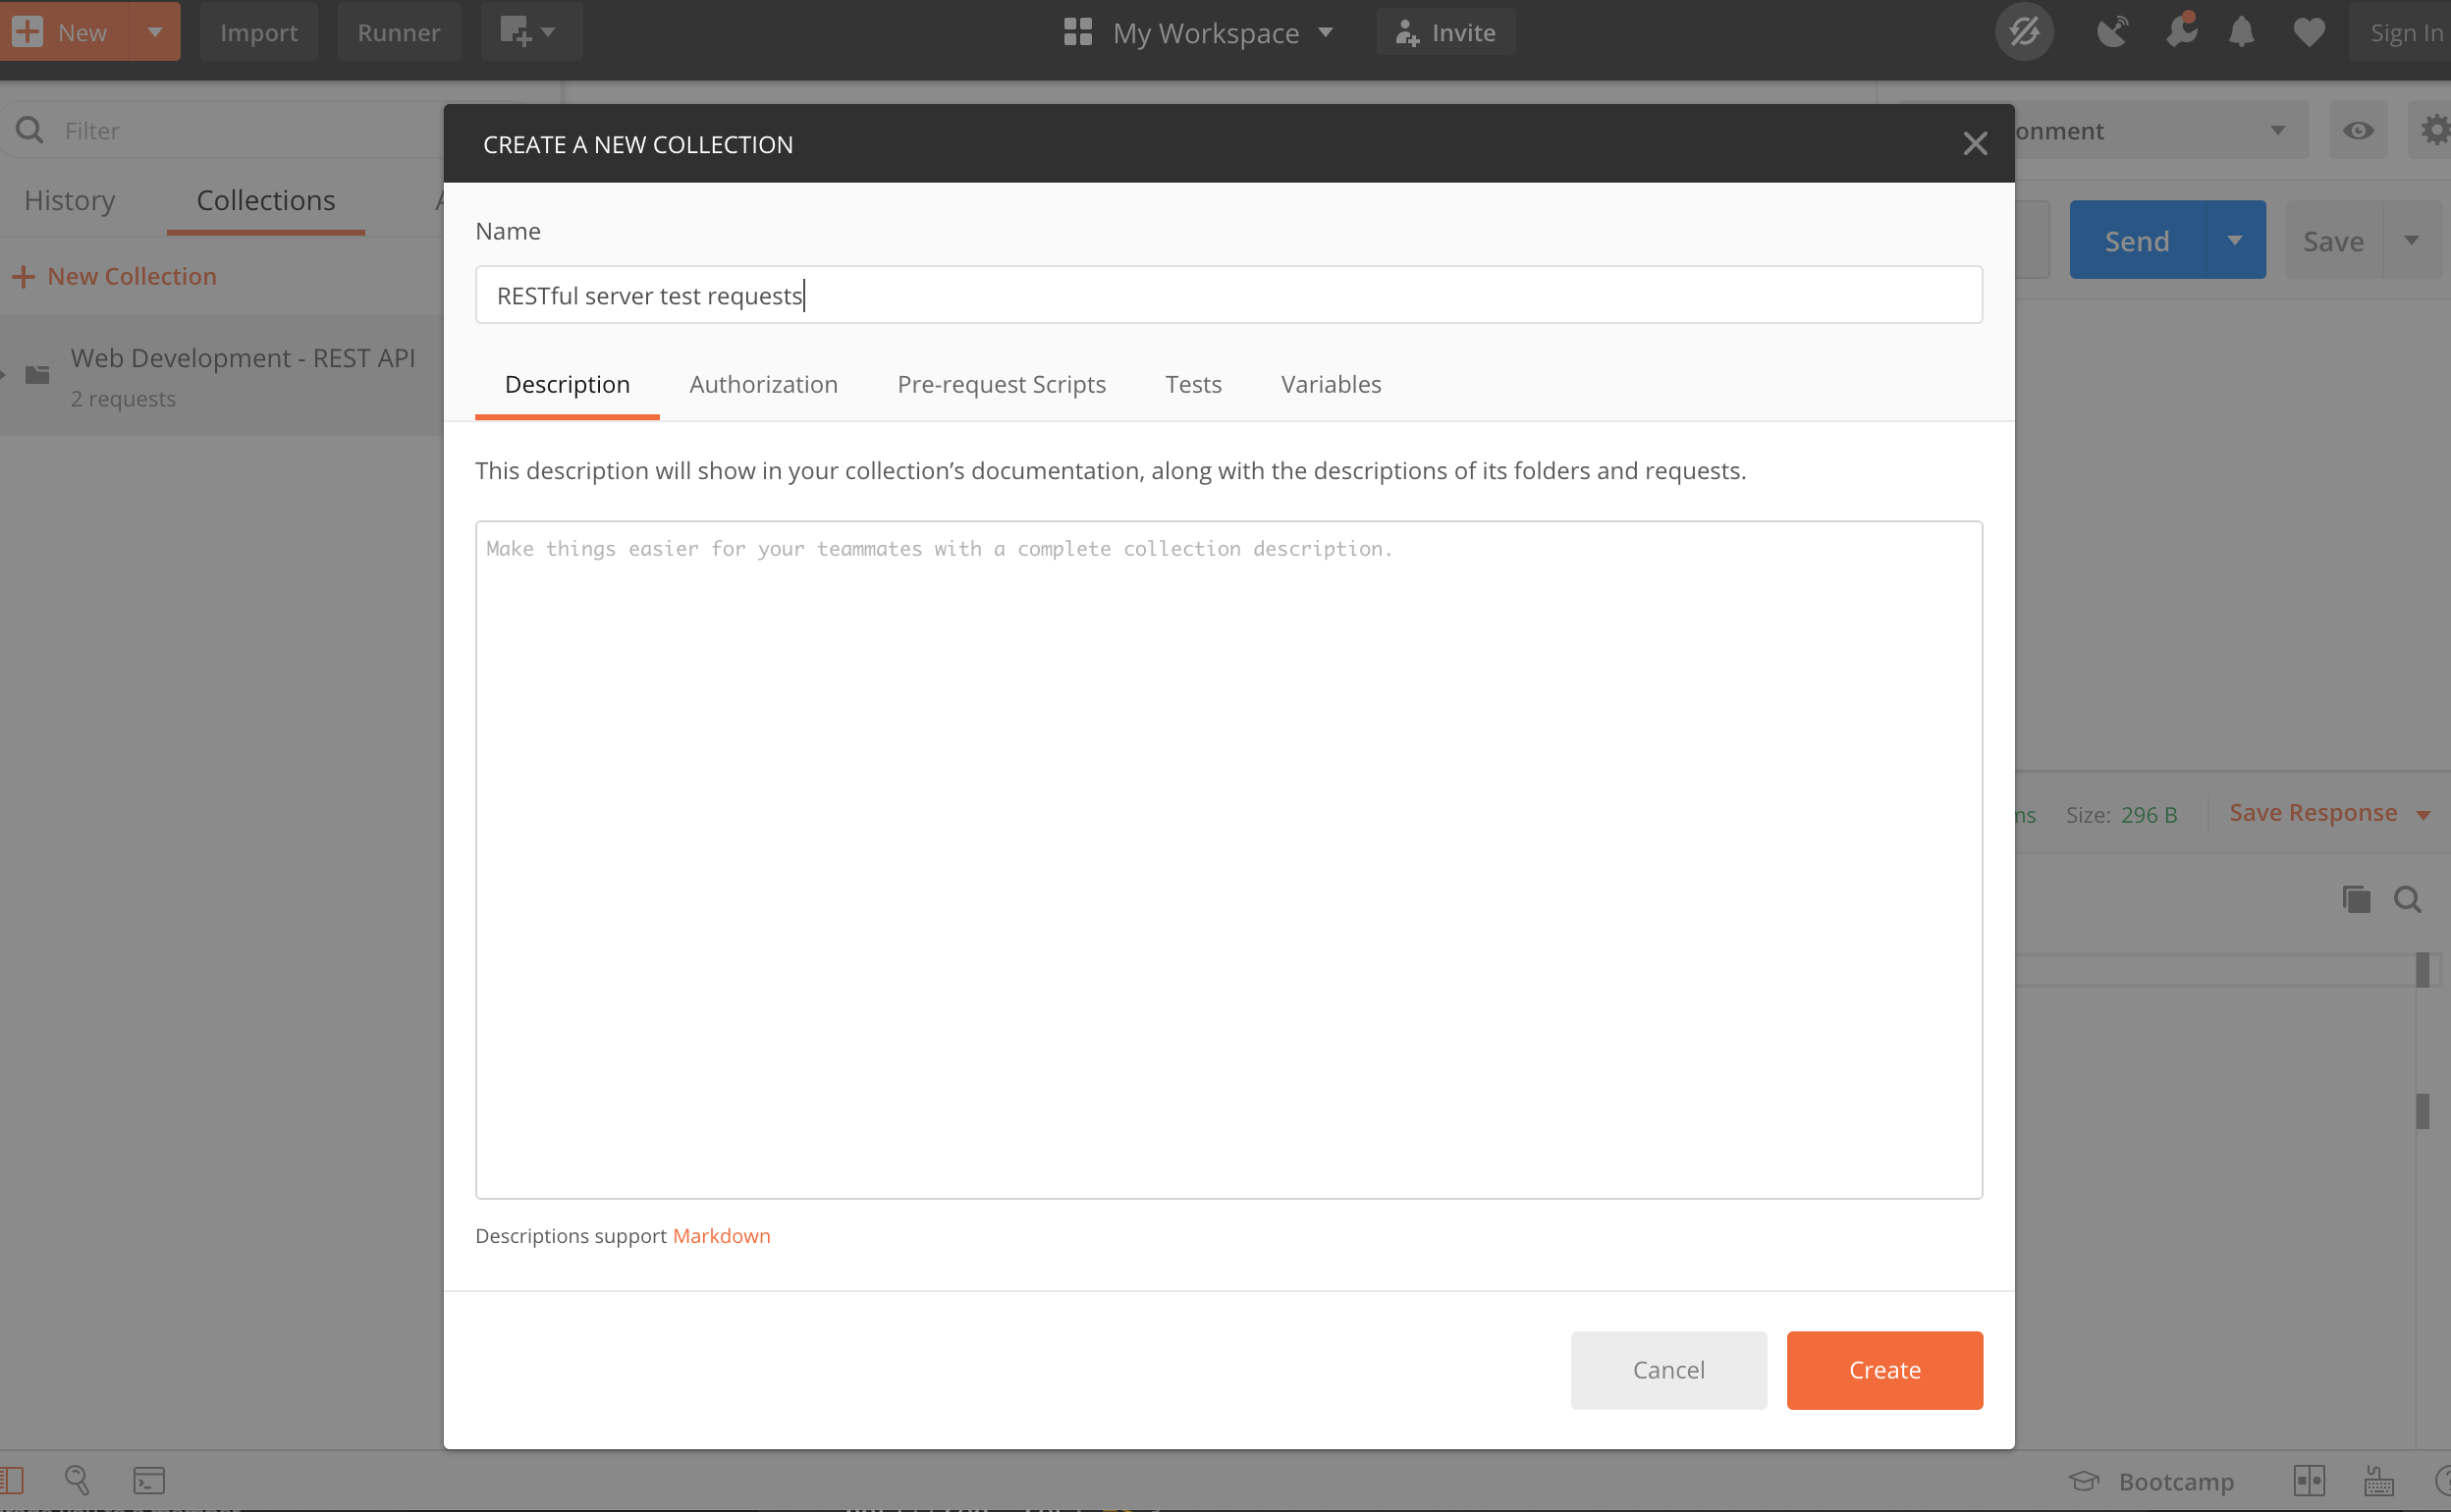
Once you download and install postman, click new collection on the left side
bar to create a new collection of API requests. Let's call it
RESTful server test requests.
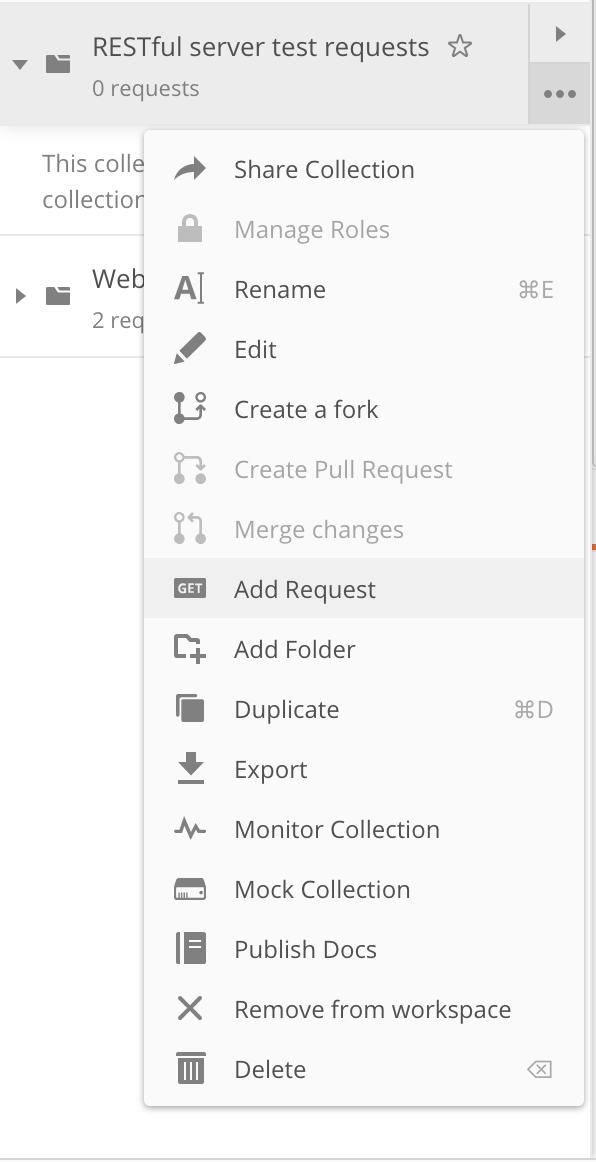
Then, click on the more button and add a request. Let's first test out the API for the root URL:
// The method of the root url. Be friendly and welcome our user :)
router.get('/', function (req, res) {
  res.json({ message: 'Welcome to the TODO app.' });
});
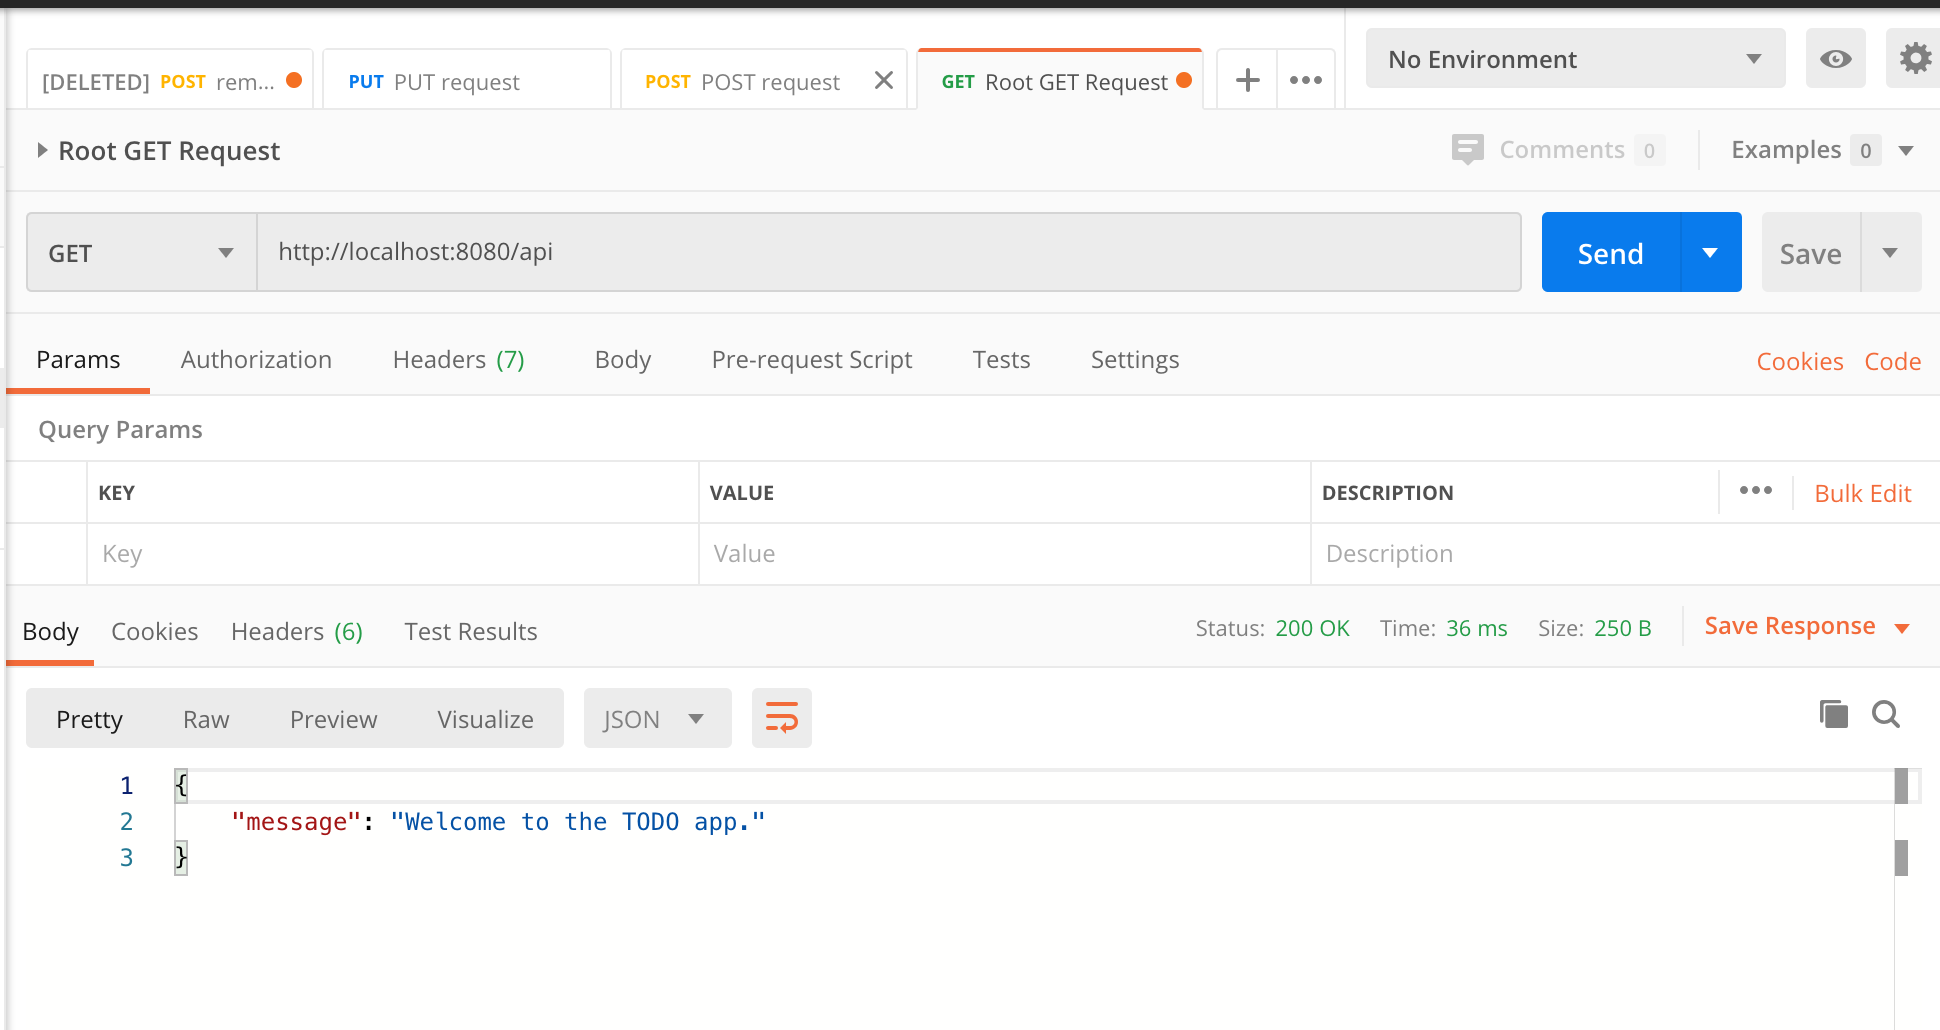
Create a request and make sure its HTTP method is GET. Our root API url is at
http://localhost:8080/api. After you click send,
you should be seeing a JSON response body, which consists of a message with the
content of "Welcome to the TODO app."
Create API requests using POSTMAN
Postman is a very powerful tool as it can save your API request and resend it
again and again at your will. Let's save this and create mroe API requests to
test the GET request that fetch all todos and POST that create a new todo.
// All HTTP methods under the /todos URL.
router
  .route('/todos')
  // This GET method is in charge of returnning all the todos.
  .get((req, res) => {
    res.json({ message: 'Return all todos.' });
  })
  // This POST methods is used to create a new todo.
  // Its request will have a body, containing the content of the new todo.
  .post((req, res) => {
    res.json({
      message: 'Create a new todo: ' + '1' + ' - ' + req.body.content,
      todo_id: '1',
      content: req.body.content,
    });
  });
Let's first create a new request, and use
http://localhost:8080/api/todos as the
request URL. We start by testing out the GET request, and after clicking send,
you should see the following JSON as a response:
{
    "message": "Return all todos."
}
Now let's try out the POST request, unlike the GET request, the POST
request contains a request body. If the post request does not contain any
body, you would receive something like this:
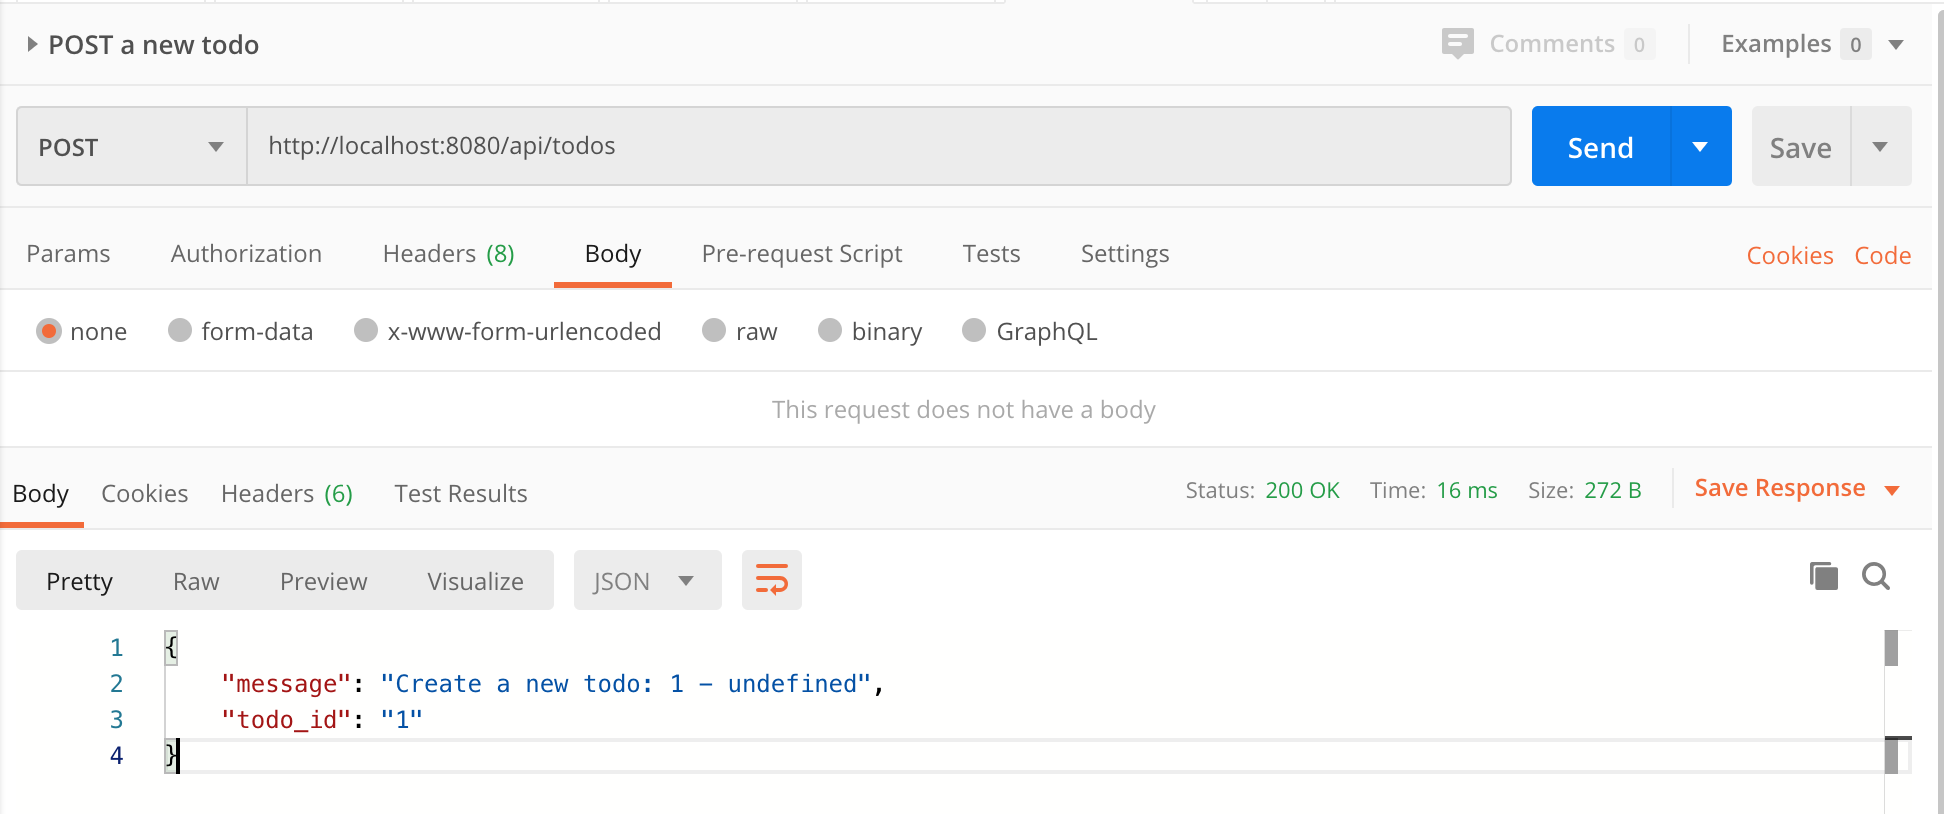
This undefined in the message means that the server does not receive the
content of the todo, which should be included in the request body.
To add a request body, click on Body and then select raw. Change the
format from TEXT to JSON, and you are ready to write your first request
body.
Let's say I want to create a todo with content "hello world todo". Then, we create a JSON like this:
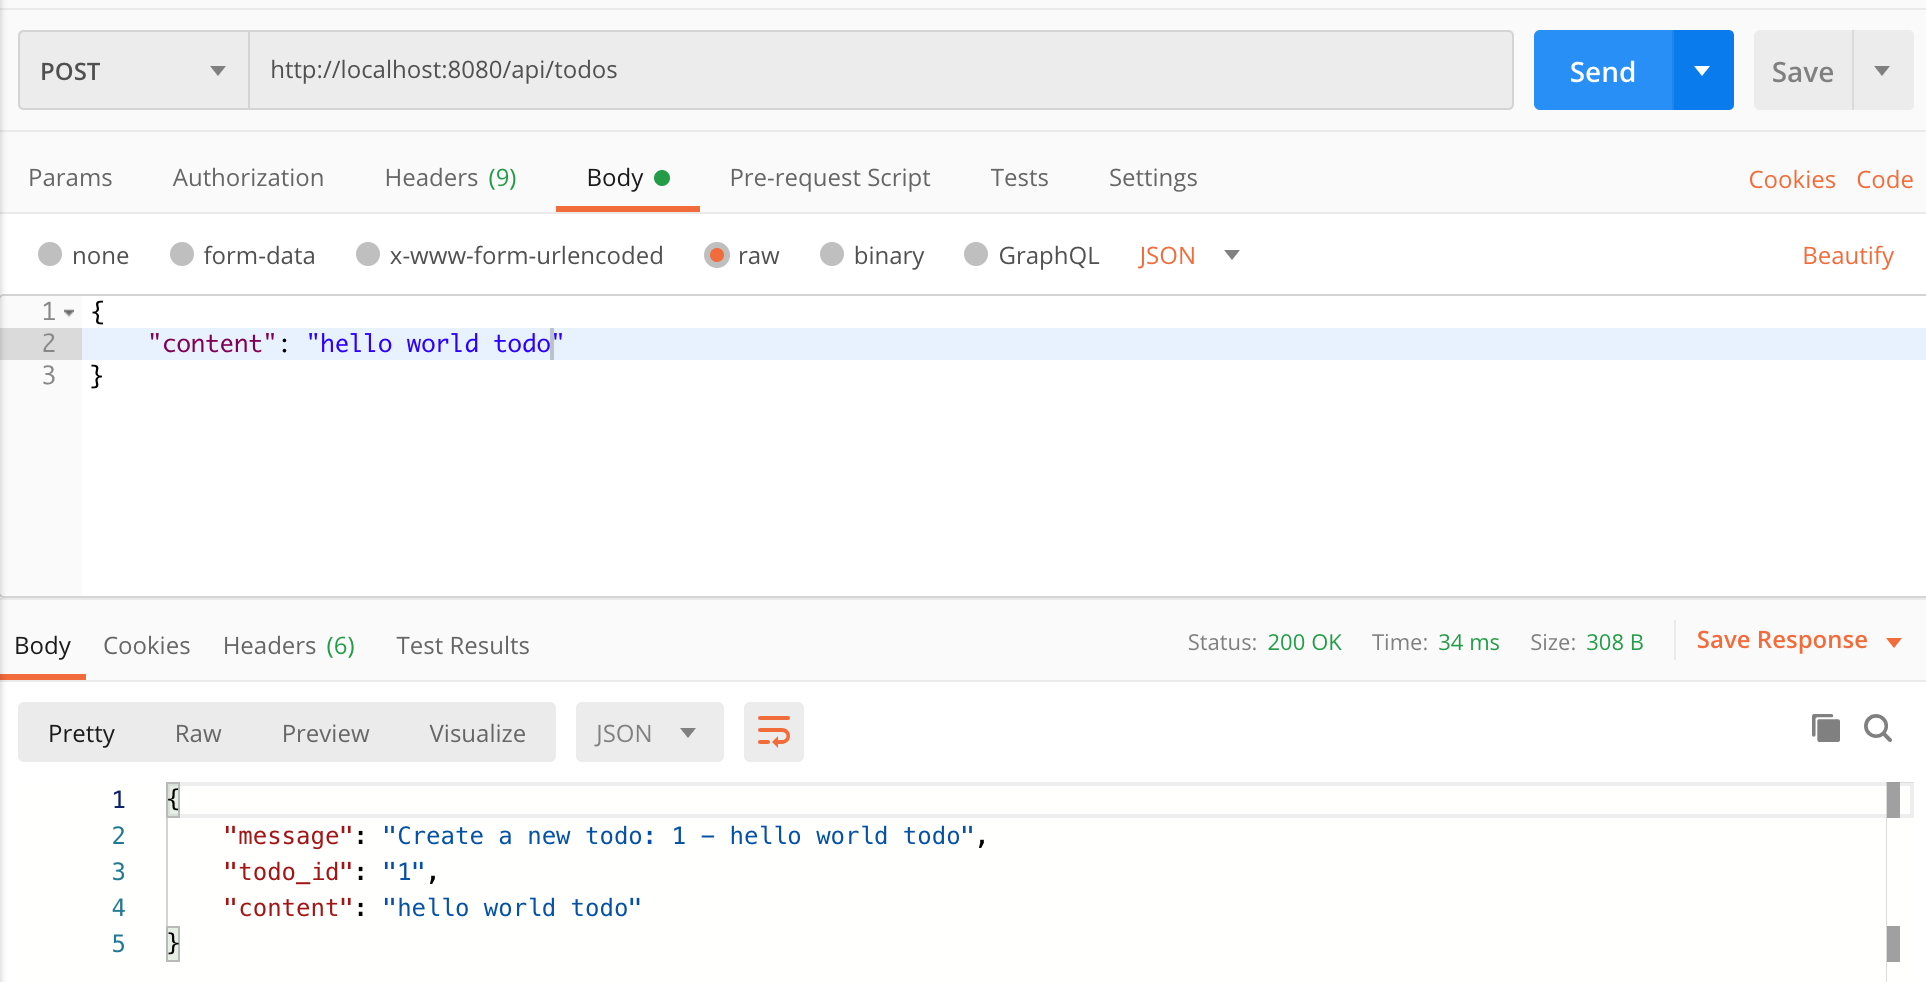
You should be receiving the message with the content you just created in the body.
Resources
Build a RESTful API Using Node and Express 4
Contributors